Introduction to C++ {Lesson Two}

Welcome to Lesson Two!

[If you missed the first lesson, you can find it here]

Wasn’t that last lesson fun? No? It was boring? Okay, I admit, introductions are normally pretty dry and dull. You’re probably itching to try some cool things on your own, but you’re bored of just outputting to the screen. Today’s lesson will give you a little more to play around with, I promise!

Data Types

In C++ (and practically every other programming language), we use something called a variable to hold data for us while the program is running. However, once the program has quit, these variables are lost unless you save them to a file somewhere (or upload them to a server). We won’t be creating or opening files quite yet, that will be further down the road. However, we will be learning some important types of variables and practice when it would be best to use them.

Storing Numbers

To store a number, we have a few different types of variables. For now, we will focus on int, float, and double. A variable with data type int (standing for integer) will hold a whole number from -2147483648 to 2147483647. Remember, this is only for whole numbers. If we wanted to use decimals, we would either use a float or double data type. The float (standing for floating point number) will allow a decimal value of about 7 digits. If you need to store a larger decimal value, try using a double (double precision floating point number). The double data type will hold about 15 digits.

Storing Characters

Characters (that is to say, anything in the ASCII table) are stored individually in a data type called char. One char variable by itself can only hold one character. Later on when we talk about arrays, I will discuss ways to hold more than one character by using more than one char. I’ve said too much, if I tell you any more now, I’ll have to kill you (that escalated quickly).

You can store entire words and sentences using a data type known as stringHOWEVER (I just had to go an ruin it, didn’t I?), string is not supported in the standard C++ libraries, so you have to include it in your code. Remember how we had to type “#include <iostream>” to include input/output? In this case, as you might guess, we will have to write “#include ”

Mr. Bool(ean)

Named after George Boole, the boolean data type holds the simplest of data: true or false; As it’s referred to in C++, “bool” is a very important data type and could possibly save you hours of work and many lines of code. Simply by storing a true or false value, you can set your program up to make “decisions” based on what is true and false. This won’t be very apparent until we discuss in full what is called a “truth table” for boolean logic. That lesson will be in the future. At first, you will either completely understand it or become overwhelmed and lie awake at night wondering just how the hell a 0 and a 1 could be so confusing. I can guarantee that with a little bit of work, you will eventually understand it and it will change your life.

Creating Variables

It’s rather simple to create a variable. Let’s say we wanted to create a variable called ‘x’ that held the value of 3. Since we’re storing a whole number (and let’s assume that we will never store a decimal number in x), we will use the data type int. We can declare (create) and assign (give x its values) the variable in the following ways:

int x;
x = 3;

OR

int x = 3;

Furthermore, if you are declaring two or more variables but not assigning any of them until later, you may do something similar to the following:

int x, y, z;

Please be warned that if you do the above declaration, all of your variables must be of the same type!

Naming Your Variables

Perhaps the most important part of creating a variable is knowing what it does! This is why naming your variable something useful is a must. For example, if you are creating an integer that will hold the user’s age, then perhaps you would just call the variable “age” or even “usrAge”. How you name your variables is up to you, but try to keep the name as descriptive and easy to write as possible. For multiple words, I start with the first word lowercase and the first letters of the following words uppercase (as I did with “usrAge”).

Variables must begin with a letter and may contain numbers after a letter. This means that “1234variable” is not an acceptable name. However, “variable1234” is perfectly fine (although not very conventional). You’ll get used to this the more you do it, so without further ado, let us begin the tutorial!

[For more on variable types and conventions, check out cplusplus.com]

Our First Real Tutorial!

Okay, I know we did a “Hello World!” earlier, but let’s get into the real stuff, shall we? Let’s start by asking a user their name, age, and favorite color. First, we’ll need to figure out which libraries we want to include. As I said in the last lesson, we will always include “iostream”, but now that we’re going to be holding information such as the user’s name and their favorite color, we’re going to have to include “string” as well. After we’re done with our includes, we’ll need to tell our compiler that we’re using the standard (std) namespace.

Create a new project (go here if you can’t remember how) named Computore 6000 and add the following to your (empty) main.cpp file:

#include <iostream>
#include <string>
using namespace std;

Next, we’ll need our main function, so let’s create that by typing:

int main(void)
{
    return 0;
}

This is where the meat of our program is going to live. Since we’re going to be storing our user’s name, age, and favorite color, we’ll need three variables. We will be storing the name and favorite color using strings and the age will be stored using an int. Enter the following just after the opening curly brace (‘{‘) of your main function and before your return statement:

string name, color;
int age;

Since name and color are both strings, I’ve declared them together. We are going to assume that both the user’s name and favorite color are one word each. Otherwise, we will run into some errors. We will discover solutions in future tutorials, but let’s enter only one word per each.

We will need tho ask the user his or her name, so we will need to use “cout<<“.

cout<< "Hello, my name is Computore 6000, what may I call you?" << endl;

You may notice a weird looking “<< endl” in the above code. “endl”, as you may be able to guess, stands for “end line”, meaning that the console window will begin a new line for the user to enter their information on. You can combine a number of things on one cout statement by adding another streaming operator (“<<“). We will see more in just a few seconds.

The opposite of “cout<<” is (bum budda dah) “cin>>”. Whatever we place after the streaming operators “>>” will be used to store the information that is coming inNote: cin will only store the first word it sees in the context we are using it at this time. Enter the following code to store the user’s name.

cin>> name;

We will continue asking and repeating the user’s information until our program is finished. Write the following code to do just that:

cout<< "It certainly is nice to meet you, " << name << "!" << endl;
cout<< "May I ask your age, " << name << "?" << endl;
cin>> age;
cout<< "Wow, you look MUCH younger than " << age << "!" << endl;
cout<< "May I ask what your favorite color is, " << name << "?" << endl;
cin>> color;
cout<< "How lovely! I also love the color " << color << "!" << endl;

The above will output:
“It certainly is nice to meet you, [user’s name]!”
“May I ask your age, [user’s name]?”
[The user enters his or her age]
“Wow, you look MUCH younger than [user’s age]!”
“May I ask what your favorite color is, [user’s name]?”
[The user enters his or her favorite color]
“How lovely! I also love the color [user’s favorite color]!”

Altogether, the final code for this project will look like this:


#include <iostream>
#include <string>
using namespace std;

int main(void)
{
    string name, color;
    int age;

    cout<< "Hello, my name is Computore 6000, what may I call you?" << endl;
    cin>> name;
    cout<< "It certainly is nice to meet you, " << name << "!" << endl;
    cout<< "May I ask your age, " << name << "?" << endl;
    cin>> age;
    cout<< "Wow, you look MUCH younger than " << age << "!" << endl;
    cout<< "May I ask what your favorite color is, " << name << "?" << endl;
    cin>> color;
    cout<< "How lovely! I also love the color " << color << "!" << endl;

    return 0;
}

Conclusions

As always, you can find the source code for Lesson Two by heading to my website’s special location for such files. Just click on lesson_two and then on computore_6000 to find the source code. All-in-all, I believe that this lesson thoroughly covers the concepts aimed at you today. If you have any errors, concerns, comments, or requests, please email me at zdaily@nfptelecom.org.

Play around with your newly found skills until the next lesson appears online. Speaking of that…

Coming Up…

Next, we will talk about if statements in order to make your program print different output according to certain conditions and user input. It will be a relatively short lesson, but will be very important nonetheless.

Introduction to C++ {Lesson One}

Introduction

So, you’ve decided to take the plunge and begin coding. I would like to start off by saying that if you’ve never coded in any other language (HTML does not count, sorry), this will not be easy. However, if you’re planning on sticking around, it will be amazingly rewarding. Everything we do in this tutorial series will cover non-GUI (graphical user interface) programming, meaning that everything we do will appear on-screen in text. You may be wondering (as I often did) just how useful text-only can be. The answer is, of course, extremely. You’ll be able to see why as the tutorials go on.

Perhaps down the road, I will introduce some GUI (pronounced goo-y) tutorials using something called Qt, but until then, let’s focus on the power of C++. Throughout these lessons, I strongly urge you to write your own code rather than copy+pasting everything you see here. I will include source code at the end of every example if you cannot get your code to work and would like a reference. The reason I’d prefer you not to just copy+paste the code here is because you will not learn anything if you do. I can guarantee that and so can any other professional developer. However you wish to read and write the tutorial and code at the same time is up to you. You can print out the lessons, open them on a tablet, use multiple monitors/computers, or go back and forth from your browser to your code.

Picking an IDE

An IDE (Integrated Development Environment) is what you write your code in. Honestly, you don’t even need to use one! An IDE simply combines the process of writing and compiling code (while simultaneously debugging) into one application on your computer. The alternative of using an IDE is to download the appropriate compiler and writing your code in anything from Microsoft’s Notepad to Notepad++. However, in this tutorial series, I will suggest appropriate (and free!) IDEs for all platforms.

[Hold on, though. I just talked about compilers without explaining what they are! A compiler reads the code that you write and converts it into what is called machine language. A simple operation in C++ might be multiple lines of code in machine language. Since C++ is more like a human language than machine language, it is easier for us to write and allows the computers to do the converting for us. For now, just know that a compiler is what makes your code run.]

I will potentially be writing these tutorials from a few different operating systems and a few different IDEs. For Macintosh OSX, I will be using the latest version of Apple’s Xcode. For Windows 8 (also available on every modern version of Windows – XP and above), I will be using Microsoft’s Visual Studio 2010. There are free express versions of this software, and I suggest 2010 or 2008. I do not actively use Linux, so I cannot add any insight on which IDEs or compilers to use. However, I’m sure some searching around the web will help you find something suitable. Once you have your IDE or compiler working, the rest of these tutorials will work for you.

I am using the IDEs discussed above for a few reasons. Though they are far from perfect, they allow an easy set-up for you. All you have to do is find them, install them, and run them. You will hear talk about how bad these IDEs may be and why people don’t like them but for our purposes, they will do just fine! However, if you are truly against using these environments, please feel free to use your own IDE of choice, the code will work on most platforms with most compilers. Below are the download links for your IDEs!

Installing Your IDE

Windows

  • Click here
  • Click on “Visual C++ 2010 Express”
  • Under “Installation Options,” click “lean more”
  • At the bottom of the popup screen that pushes the 2012 version, click “Visual C++ 2010 Express”
  • If these options have failed because of an update to Microsoft’s website, I have uploaded a version to my server, which can be found here.

An installer will start and begin setting up your environment when you run the application. Unclick the checkbox saying that you want to send information to Microsoft if you so choose, click next, “I Agree,” Next, and then let the installer work its magic!

Installing Microsoft C++ Express 2010
Once the installer has finished, you’ll be good to go!

OSX

  • To download Apple’s Xcode, simply click here and follow the directions.
  • Agree to whatever you need to agree to, sign up for whatever you need to sign up for, and move on to the next section!

Creating a Project

The steps for creating a project will be more-or-less the same every time, so use your intuition in the future when I ask you to create a new project. For now, follow these steps!

Windows

2
Open Visual C++, and click on “New Project.”

3
Select “Empty Project” and name it “Hello World”. Click “OK.”

4
In the Solution Explorer (on the left), right click on “Source Files,” hover over “Add,” and click on “New Item.”

5
Select “C++ File” and name it “main.cpp” and click “Add.”

You will be greeted with a wonderfully blank .cpp file (.cpp of course standing for C++) and you will be ready to code your first project!

OSX

Screen Shot 2013-07-11 at 9.43.58 AM
Open Xcode and click on “Create a new Xcode project.”

Screen Shot 2013-07-11 at 9.44.59 AMOn the left side, under OS X, click on “Application” and select “Command Line Tool” and hit the Next button.

Screen Shot 2013-07-11 at 9.45.33 AMCall the project “Hello World” and enter your name for the Organization Name. For Company Identifier, go ahead and write “com.” plus your first initial followed by your last name. Under “Type,” select “C++” and hit the Next button.

Screen Shot 2013-07-11 at 9.46.10 AM
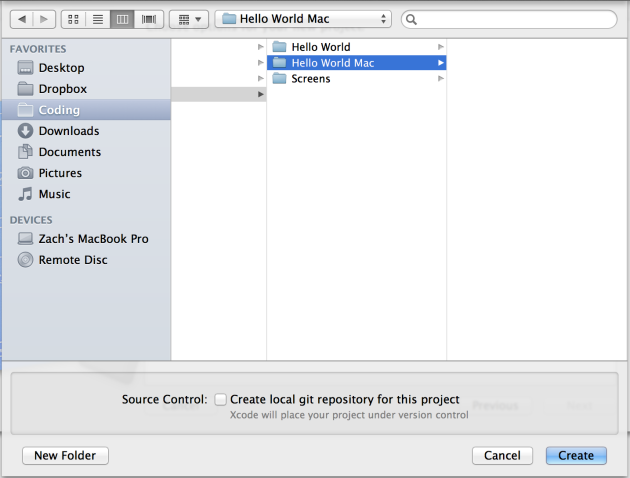
Find a place to save your project and leave the check box unmarked.

Screen Shot 2013-07-11 at 9.48.26 AM
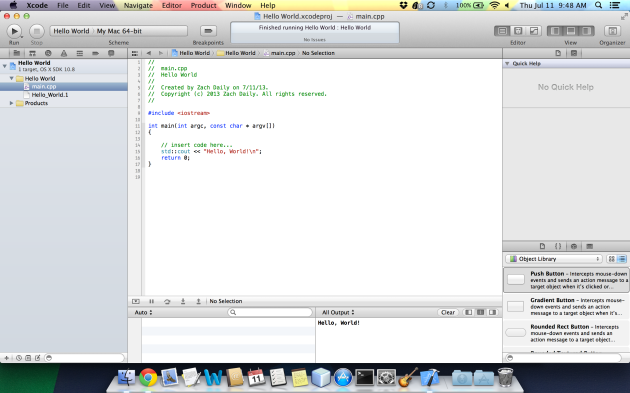
You will be greeted with a scary looking screen, but go ahead and ignore that for now because you will be clicking on “main.cpp” in the left-side project explorer. If you notice in the bottom (middle) right, after compiling the project, the output will display under “All Output.” Once we get into user input, you will be able to click on this section and type into it.

For now, delete all of that code, because we will be writing our own Hello World in the next section!

Writing Your First C++ Program!

Here it is, the very moment you were born for. Make sure that your main.cpp file is completely empty and get ready to start typing! I will explain what each piece of code means. Although they may not be in-depth at the moment, it will make sense the more you do it. Remember these steps, because most of them will be the same for every project you create… ever. Let’s begin!

Start by typing:

#include <iostream>

iostream stands for input/output stream. This means that our program can now write as well as accept incoming text from the user. The “#include” lets us include the code that allows for i/o handling without having to write it ourselves. For now, just know that it is extremely necessary.

On the next line, write:

using namespace std;

This is important to allow us to write shorter code and for our compilers to know where to look for certain libraries that contain the objects and classes that we will be using. It is difficult to explain with this being your first project, but it makes your job much simpler.

Lastly, we will write our main function, which will display “Hello World!”

int main(void){
	cout<< "Hello World!";
	return 0;
}

“int main(void)” specifies that this is our main function. The main function is the block of code that runs first when your program is executed (started). The “int” before “main” means that the function will be returning an integer (a whole number) when it is done executing. This information is used to tell other programs or the operating system how the program exited. We will most likely never have anything different in our code throughout all of these examples.

“void” refers to the information coming in to the function. Often times, you may be able to pass something called an argument to a function which will help it do something specific. For now, we will enter “void” since no information is being passed to our main function.

“cout” (c-out) means that we are outputting text to the screen. The “<<” is a streaming operator that means information is being sent out. It is easy to remember because it looks like little beams are leaving the word “cout”. Later, we will have another streaming operator that looks like this: “>>”. That will be used for input, but for now, just focus on the “cout<<“.

Next, we use double quotations to show that we are outputting text. If we were to just output a single character, we would use single quotations (‘a’). The semicolon (;) is called a delimiter. Basically, this allows the compiler to know that your line of code is over. You also see it above with “using namespace std;”. It is not used after every line of code, but it is used after every command or operation. You will pick it up eventually. Be aware that most beginners forget their semicolons, so if your code is giving you trouble, make sure you have those little buggers in the right place!

Since we told the computer that we would be returning an integer early, we return 0 (that’s a zero!). At this point, this is unimportant to understand, but it must be included. Any function that has a return type must return something.

The curly braces (‘{‘ and ‘}’) tell our compiler that there is a block of code coming up. There will be many nested braces in the future, but think of them is stacking on top of each other like many pieces of paper. For now, you just have these two little guys.

All-in-all, the entire code will look like so:

#include <iostream>
using namespace std;

int main(void){
 cout<< "Hello World!";
 return 0;
}

Running Your Code

Running your code is pretty straight-forward for Mac OSX. Simply hit “Run” in the upper-left corner (or strike cmd+r on the keyboard) and watch the output show on the bottom right!Screen Shot 2013-07-12 at 8.31.33 AM

For Microsoft Visual C++ Express users, you can hit f5 or use the top menu bar to select Debug -> Start Debugging. The problem for you is that the screen will open quickly and then close, barely giving you enough time to even read half of a letter. There are a couple ways to fix this, although they may not work entirely.

This first example did not work for me, but it may for you. On the menu bar, click on Tools, hover over Settings, and click on “Expert Settings.” Now, a new option under Debug should appear called “Start Without Debugging.” You could also hit ctrl+f5 after selecting expert settings to run this. For me, this closed the window even faster. In the non-express version of Visual Studio (part of the suite that houses Visual C++), this option works just fine.

This last method of keeping your output on screen is not considered good practice because it will only run cleanly on Windows PCs. Before typing “return 0;” in your main function, add in:


system("pause>nil");

This will make the screen wait to close until the user has pressed any key. The “>nil” means that we are not displaying a message. Leaving that out would print “Press any key to continue…”. Adding the above code to your Windows projects (ignore this, Mac and Linux users) will ensure that you can see the proper output from your code before the window closes. For Windows users, the final code will be:


#include <iostream>
using namespace std;

int main(void){
cout<< "Hello World!";

system("pause>nil");
return 0;
}

From now on, I will not be adding the pausing code to any of the source code. I will leave it up to you to remember to put that BEFORE the return statement of any of your main functions in future projects.

Conclusions

That’s it for this lesson, folks! Please feel free to email me with any questions, suggestions, typos, errors, or feedback at zdaily@nfptelecom.org. You can find the source code for Lesson 1 at this location: http://www.zach-daily.com/downloads/source_code/lesson_1/

Coming Up…

Next, we will talk about the different data types and how to store, retrieve and operate on them using a handy little friend called variables. We will be doing a project that will teach you the skills to ask a user for input and store that information properly within your program. I will also begin introducing “homework” at the end of each lesson where you can practice your skills. Expect one or two new lessons every week!

Continue on to lesson two!

Logic Compiler

Logic Compiler

For my Compiler Construction final project, we were instructed to make a compiler that wrote automated MASM instructions.

This compiler is written in C# and takes truth values, variables (which hold truth values), and logical operators from a user. It includes error-catching and the ability save the generated code to an external file.

Peg Game AI

Peg Game AI

The Peg Game AI is coming along nicely!

That being said, the AI doesn’t actually do much yet. As of now, it can determine which pegs can move, where they can move, and how many possible moves each peg (and all pegs) can make.

I’m doing this project mainly because I want to find the best possible combination of moves for every initial setup of the peg board. If anybody wants to thumb through my code, feel free to PM me and I’ll send you a link (it’s in C#). I keep my code very well commented and try to keep it as brute-force-less as possible (although a lot of things are brute-forced :P).

Can I Afford It?

I’ve come to the acceptance that I am not the greatest at handling my money. Last summer, I wasn’t as… frugal as I would have liked to be, so this summer, I’m making sure that I don’t screw up again!

Android Application

"Can I Afford It?"

Introducing: Can I afford It?
This little baby is going to save my back when those hard-to-resist purchases come around. Basically, here’s what happens:
1.) Insert the amount of money you currently have
2.) Organize expected pay dates and expected paycheck amounts
3.) Set Goals:
a.) How much money you want to reach in total (Say you’re saving up for something that’s $2,000)
b.) How much money you want to have by a certain time (X amount by the end of July)
4.) Now that you’re all set up, you’re ready to use it!

Using it is simple:
1.) Enter the price of the item(s) you wish to purchase
2.) Check the toggle switch if you plan on buying more that day (Lunch, Dinner, Movie Tickets, etc)
a.) There is a list of approximate cost of those later purchases
3.) Hit “Calculate”
4.) If you decide it’s a good idea, click “I Bought It!”

The yellow text (“Amount After Transaction”) will tell you how much money you will have available if you purchase the item. The red text (“Amount Able To Spend”) is how much you are able to spend while still staying within your target goal.

At the moment, the only thing I’ve done on this app is the UI. With the amount of work I have left on it (developing a scheduling system, learning how to save/load, etc), I estimate I’ll be finished with a nice beta release by the beginning of February, 2012. Stay tuned for more information!

Beginning Weight Gallery for Android

Weight Gallery is a PC application to aid theatre technicians while hanging units on stage or in the weight gallery. This version, specific to the theatre department at SUNY Fredonia, includes a list of all possible electrics that can be hung on a line set. From here, the user can add the unit and see how many 1″ or 2″ bricks they should use to properly counter the weight. It also keeps a list of what is on the line set and how many bricks should be on it in total.

The program was part of an extra credit assignment in my VisualBasic II course. After much time off from school (and much interest from the head of the department), I decided it was time to port the application to C++ (using Qt) for use on PCs, Linux, and Mac OSX (seeing as the entire theatre department runs on Apple products).

Just a couple weeks ago, I started porting the project to Android. While writing this application, I am simultaneously learning Java and Android development. Fortunately enough for me, Java is very, very similar to C++ and it’s been a breeze so far. After about three weeks of off-and-on programming, I’ve finally made a nice, working version of Weight Gallery Mobile. The application doesn’t save or load yet, but the calculations work and, as of now, it is completely error-proof. Go ahead and try to make the program crash, this is the third time I’ve written this application. I know everything that could/will possibly go wrong with the operation of it.

Screenshots:

As you can see, the maximum number of items allowed on a lineset is 60.

Stay tuned for more information!

Download it here. <- Click that! 🙂

Weight Gallery (Part Two)

The following is from my Tumblr on November 21st, 2011

Last semester, I was involved in the student expo at my university with the CS department. My task was simple: make anything I wanted in Visual Basic (this was extra credit for my VB II class). Freaking out over what I would do, I decided to help out the theatre department. One of my least favorite tasks while building a show was sitting in the weight gallery, so I thought I would figure out ways to make it easier for everyone.

On April 20th, I released Weight Gallery to the world (which has had 125 downloads since). Fast-forward to this semester. After talking to Tom, the head of the theatre department at SUNY Fredonia, I began working on a cross-platform port of Weight Gallery. Coincidentally, I am also taking a course in Qt4. Seeing as most theatre technicians at SUNY Fredonia use macs, I began planning my port immediately.

Unfortunately, my semester has been intense, so I didn’t get much work done until just yesterday. Within one day, I completed almost as much as I did in one entire month.

It’s fully functional, just not as customizable as its predecessor. That is all to change within the next couple days.

More of my plans?
(keep in mind these have not been discussed yet)
– I want to implement this in Marvel Theatre
– There will be a server application on the ground floor that will
communicate with a client application in the weight gallery.
– These programs will both be run on tablet PCs (running linux) connected
via wifi.
– I would like to make this program mobile (Android, iOS, etc)
– Synchronization between platforms will happen via a linux server (free to all
SUNY Fredonia students – using their FredID).

I’m too tired to stay awake and continue typing. Any questions? Wanna beta test? Let me know!

Weight Gallery (Part One)

The following post is from my Tumblr from May 5th, 2011.

Introduction
I’ve spent the past 4 months programming my chops off and trying to retain a good grade in school while doing so. Not that I don’t have good grades, but the programming from one course has absolutely hindered my chances of reaching my potential in my difficult, non-programming courses (*ahem* Biology) – oh, and in another programming course.

In the beginning of the semester, my Visual Basic professor noticed I was doing a good ‘ol job in all the projects and asked me to do something that made me feel as special as Charlie when he got the golden ticket (and an honor that any programmer would jump at); he asked me to create a program for the Student Exposition on April 28th. Immediately, I said yes because – why not? I asked him what he wanted me to submit and he said “anything.” Naturally, I panicked. This is for two reasons:
1.) That’s a LOT of freedom to give to me
2.) That’s TOO much freedom to give to me

Allow me to expand my thinking here. If I even HAD an idea for a program, I would have already been working on it. Unfortunately, every idea I could come up with was sub-par and nothing that would be a challenge, which is what I needed. Likewise, I wanted it to be something people would USE. Naturally, I thought for days.
Cue my OTHER major (Theatre Arts). During the excruciation that was Sound of Music, I was asked to work in the weight gallery. If anybody out there is a theatre major, you either love the weight gallery or you hate it, there’s no in-between. I hated it. For those of you who don’t know, the weight gallery is located about 60-80 feet above the stage. When you’re up there, you must be harnessed in and the people on the floor yell to you to lift heavy bricks to and from each lineset. However, none of these were the reasons why I hated the weight gallery – it was simply too boring. You’re 60 feet in the air and you have nobody to talk to except whoever they stick you with.


View from the weight gallery – There’s a person down there.

One day, whilst sitting in the weight gallery (alone), I got fed up with how long it took the people on the ground to calculate the weight of each lineset and started thinking about how I could improve it. Not that I was fed up with the people – the process was just too long, which is understandable, it’s an important job. Thus began my months of agony and little sleep.

The Business of Life
This semester was, hands-down, the busiest one of my life, and hopefully will never be topped. Not only did Sound of Music, classes, and my TV show (coming soon) suck up about 70% of my time, but other homework (that wasn’t my new baby, “Weight Gallery”) took up about another 10%. This left 20% for food, sleep, and Weight Gallery. Needless to say, I slept maybe 4-5 hours a night and lost over 20 pounds since January.
My C++ class began losing my attention. To be honest, learning 2 different languages at the same time really messes with you. I began writing VB code in C++ and vice-versa. It’s funny when you think about it, but extremely frustrating while it’s happening. I would put random semicolons in bits of VB code, making it give me dozens of errors. Thankfully, Visual Studio 2010 is very good at telling me how terrible of a programmer I can be at times.

For months, I stressed over small errors (forgetting to type “-1” was a huge one… a few times). Eventually, I came to the conclusion that I would have to stop being stupid and start being a real programmer. My typical day went as such:
– Wake up seconds before class
– Show up to class with semi-closed eyes
– Pay as much attention as possible
– Eat something… maybe
– More classes
– Sound of Music until about 8:30 at night
– OR – If it was during tech/show, until about 12:00-1:00 AM
– Fooooooood
– Energy Drinks!
– Shower
– Contemplating on crying
– Suck it up, and program
– Go to bed at 5:00 AM

In the end, I finished my program the night before the expo with about 36-48 hours of work (probably even more), over 1,000 lines of code, and probably just as many facepalms. My work was rightfully reflected in the outcome of people interested: 3 people. Yeah, that last sentence was sarcasm. 3 people looked at my exhibit, and I knew them all. Not that I was expecting everyone to run to me, but whatever. The expo isn’t the end of my program’s life, it’s just unfortunate that nobody noticed it.

Screenshot of Weight Gallery You like it? It’s pretty isn’t it? Hard to believe I stressed so hard over something so simple-looking, eh? Well I did.

The Experience
Overall, if I had the opportunity to do this project again, I would [WHICH I’M DOING NOW!]. In order to get this project done, I had to read through future chapters in the book and learn things I didn’t think I’d ever know. As challenging as this project turned out to be, I know it could have been much worse. It was about as challenging as I had hoped it would be. As stressful as it is, it’s extremely fun to get stuck on a problem, stare at the screen for 3 hours and notice that you forgot one letter. This is something that I created from the ground up. It started with one line of code and blossomed into a beautiful, multi-thousand-lines-of-code flower.
Not only was the knowledge extremely useful, but I’m building my career. My professor told me I could use him as a reference whenever I needed, I have a program under my belt that is actually useful (and released!), and I’m recognized by the school as having participated in the exposition. I can actually make a resume that has experience on it, which is something that is incredibly useful.

Closing
So there it is, my semester in a nut-shell. If you’re a theatre technician with a Windows PC, you might as well download the program, it couldn’t hurt anything. 🙂

Sex To download Weight Gallery, click here!